SQUARES
A sequencer with no piano roll. You paint rectangles on a plane: where a square sits is when and what it plays, how wide it is is how long, how tall it is is how loud. Four colours, four voices, one canvas. It's the drum machine your art teacher warned you about.
Quick Start
- Load SQUARES on an instrument track (or go standalone — it opens full-screen).
- Pick a colour on the swatch row.
- Drag on the canvas. You just wrote a note. Draw a few more at different heights and widths.
- Press play — or run your DAW transport. The playhead sweeps; squares sound as it crosses them.
- Switch colours and paint again. Two colours, two independent voices. You have a band now.
The Machine
- Top bar — the PATTERN | SCALE view switch, plus the trial/license pill.
- Canvas — the plane. Grid lines mark beats; it breathes slightly on each one. A scale timeline strip runs underneath, always.
- Right panel, top to bottom — transport (standalone: play/stop, drag the BPM number, 20–300), play-mode buttons (
FWD · REV · PND · PRB), Presets, LOOP LENGTH +Sync All, Clear All, the colour swatch row, and the colour config tabs (SQUARES · PITCH · SOUNDS). - The logo at the bottom is the door to Settings. Click it.
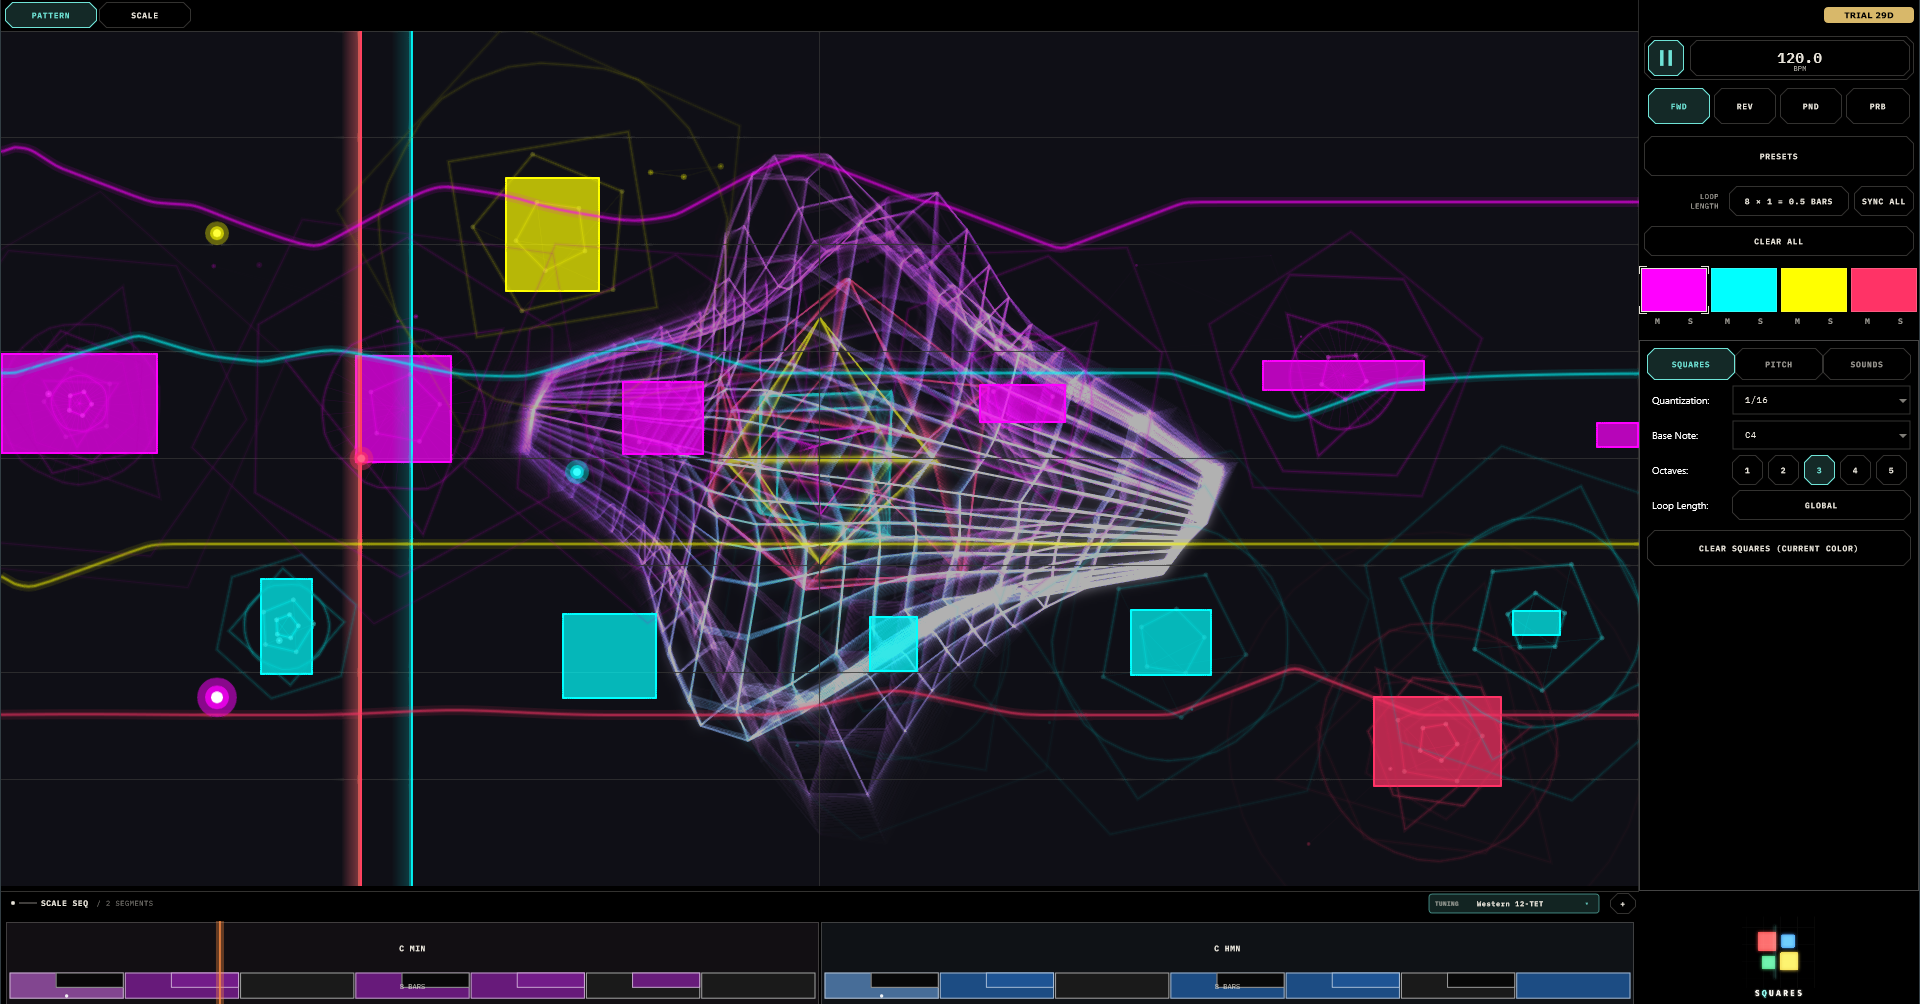
F11 (or Ctrl+Cmd+F) toggles fullscreen in standalone.
Squares
Every note is literally a rectangle:
| Dimension | Meaning |
|---|---|
| Left edge | When it starts |
| Width | How long it lasts |
| Vertical position | Pitch — higher is higher, snapped to the current scale |
| Height | Velocity — tall is loud, short is quiet |
| Colour | Which of the four channels owns it |
A thin tall square is a loud stab. A wide short square is a long whisper. Shape your squares like you mean them.

Drawing & Editing
- Drag on empty canvas — draw a square in the active colour. A plain click drops a minimum-size one.
- Drag a square's body — move it. Drag an edge or corner — resize (all eight handles work).
- Double-click or right-click a square — delete it. Delete/Backspace kills the selected one.
- Click a square of another colour — eyedropper: that colour becomes your active brush.
- Ctrl/Cmd + scroll — zoom (up to 16×, around the cursor). Plain scroll pans when zoomed. Pinch works on touch. Home or 0 resets the view.
Squares sit exactly where you put them — the grid is a reference, not a straitjacket. Timing snap happens at playback, via each colour's Quantization setting (1/32 … 1 bar).
The Four Colours
Four channels. Each owns its squares, its pitch range (Base Note + 1–5 Octaves), its quantization, its output voice, its pitch-sequencer curve, and optionally its own loop lengths. Polyphony comes from combining colours — each colour is monophonic, so overlapping squares in one colour steal from each other. That's a feature: it's what makes a colour phrase like a player instead of a chord organ.
The swatch row is also a mixer: each swatch has M and S zones along its bottom edge — mute and solo, live. They gate new notes only (nothing ever sticks), they're for performance, and they deliberately don't save with the preset. Swatches pulse when their channel speaks.
Sound
Each colour routes to one of two voices on its SOUNDS tab — Sound (the shared pluck) or Sampler (its own granular engine). MIDI goes out regardless (see MIDI Out).
Sound — the pluck (global, shared by all colours)
One plucked-string instrument plays every colour routed to it. Its faders paint in the accent colour rather than a channel colour — that's the interface telling you they belong to everyone:
- Brightness
- woody → glassy.
- Decay
- staccato pluck → long ring-out.
- Damping
- how fast the sparkle dies out of a note.
- Stiffness
- ideal string → piano-like bite.
- Body
- how much instrument-body resonance sits under the string, chosen from the IR menu: Dry Pluck, Violin, Viola, Cello, Double Bass — or load your own (any WAV/AIFF; the first two seconds become the body of your instrument). Yes, you can make it resonate through a recording of your kitchen.
- Level
- up to 200%, because sometimes.
Sampler — the granular engine (one per colour)
Load opens the sample browser — navigate folders, tap the triangle to audition, tap a name to load. Each colour remembers where it was browsing. The waveform draws in the channel colour with a live playback cursor.
- Speed
0–2 - playback rate, where 0 is a full freeze. Doesn't touch pitch.
- Grain
10–500 msand Decay - the size and softness of the grains: small and hard is buzzy, big and soft is a cloud.
- Pitch
±24 st - independent of speed. The square's vertical position pitches the sample too, across the colour's note range.
- Drive and Level
- grit and gain.
- Mode
Steady(orderly time-stretch),Random(grains from anywhere; instant texture),Scatter(drunk but loyal — wanders around the playhead).
A preset that points at a moved file shows MISSING and plays silence — re-load the sample to revive it.
The Pitch Sequencer
Every colour has a second, secret sequence: a continuous pitch-offset curve on the PITCH tab. Draw it right on the canvas. Any note that colour fires is transposed by whatever the curve says at that moment — then snapped back into the scale, so it can't play a wrong note, only a different right one.
The trick: the pitch curve has its own loop length. Give a 4-bar square pattern a 3-bar pitch loop and the phrase mutates every pass for 12 bars before the two cycles re-align. This is the cheapest evolving melody in the business.
Loops & Play Modes
Loop length is Steps × Bars — steps 1–16, bars 1–64, and the picker shows the arithmetic live (7 × 4 = 1.8 bars). Sixteen steps is a normal bar; 3, 5, or 7 give you odd meters; prime bar-counts (13, 29…) give you loops that almost never repeat.
Three loop lengths exist per colour: the global one (right panel), a per-colour main override (SQUARES tab) and a per-colour pitch override (PITCH tab) — each either its own value or Global. Different lengths per colour is the fastest polyrhythm in any DAW. Sync All rounds everyone back up to the global value when the experiment is over.
Play modes
FWD- left to right, like a law-abiding citizen.
REV- right to left, everything mirrored.
PND- pendulum; reflects off the loop edges.
PRB- probability. The playhead's step order gets shuffled anew every loop. An XY pad appears: X sets how far notes stray (1 step to a full bar), Y sets how much shuffling happens. Low-left is a gentle stumble; top-right is teleportation.
Scales, Keys & Other Worlds
Every note — pluck, sampler, and MIDI — snaps to the active scale. No wrong notes, only surprising ones.
The scale timeline runs under the canvas: a chain of segments, each a root + scale + bar count (1–16 bars, up to 16 segments). One segment is a static key; several are a chord progression your squares re-harmonise through automatically. Tap a segment to edit it, drag its edge to resize, and tap individual keys on its keyboard to sculpt a custom scale — a * marks your mutations (C Maj*). 16 scales ship, Chromatic through both Diminisheds.
The SCALE view (top bar) is the full-screen version: circle of fifths with per-colour activity dots, editable segment chips, and a live output monitor lighting up the notes that are actually sounding.
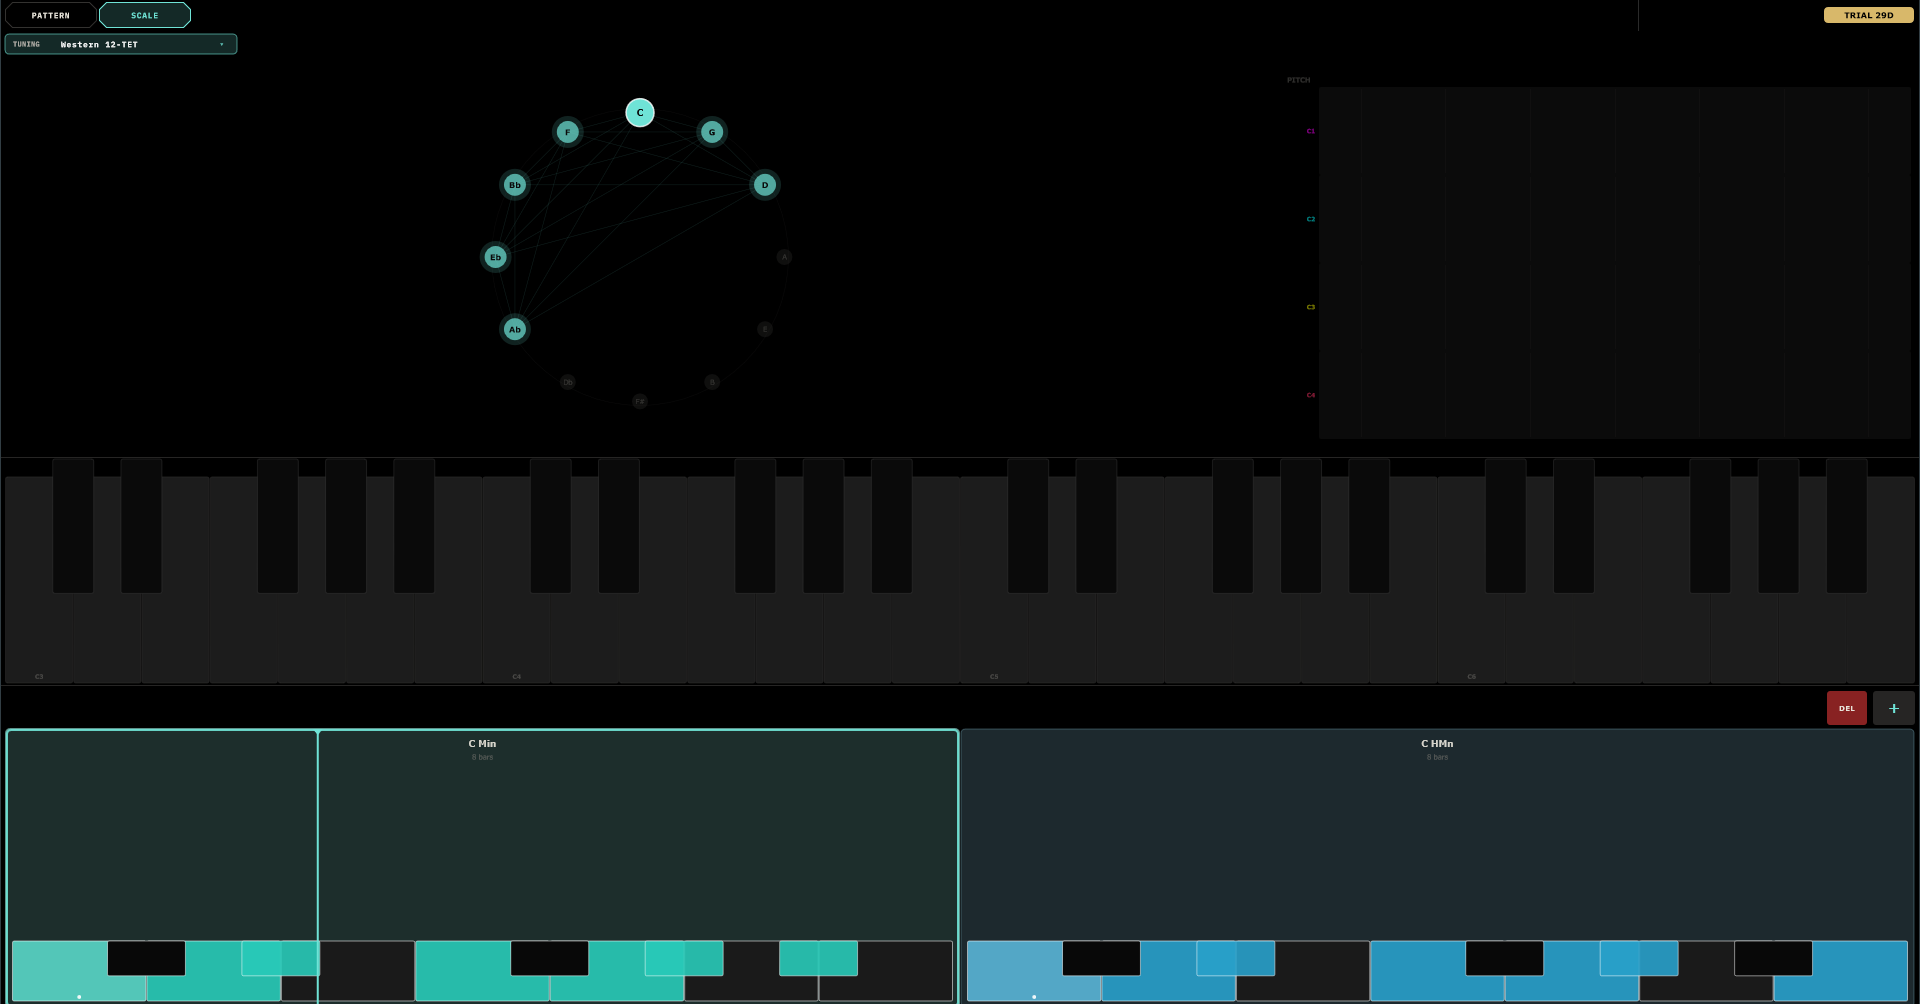
Other tuning worlds: the TUNING chip switches the global intonation — eleven systems, from Western 12-TET through Just Intonation, 24-tone Arabic maqam, 53-comma Turkish makam, 22-shruti, Persian dastgah, and Chinese 12-lü. The circle of fifths becomes a tuning wheel with every pitch at its true position. The pluck and sampler play these tunings exactly; MIDI out approximates them with pitch bend (see below).
If a host pushes a global key (the TouchMachines Liveset does this), SQUARES follows it, shows FOLLOWING HOST, and locks its scale surfaces until released.
MIDI Out
SQUARES always speaks MIDI — every colour, every note, on one global MIDI channel set in Settings. Route it to an external synth and the canvas drives that too, alongside (or instead of) the internal voices. Velocity comes from square height; pitches follow the scale after pitch-curve offsets.
Under a microtuned system, MIDI out sends its best-effort pitch bend before each note — exact for one line at a time, approximate when simultaneous notes want different microtonal degrees. The internal engines are always exact.
Presets & Settings
Presets opens a browser with folders: tap to load, + SAVE, drag to reorganise, rename and delete in place. A preset captures everything — squares, curves, sounds, sample paths, scale timeline, loop lengths, play mode. Full state also saves inside your DAW project like any well-behaved plugin.
Settings (click the logo): the global MIDI channel, the visualisation stack (the wireframe sphere, bloom, rotation, opacity — all cosmetic, all CPU), nine colour themes from Cyberpunk to Sunset plus fully custom channel colours, and licensing. SQUARES runs a 30-day free trial, fully functional; the pill in the top bar counts it down, and afterwards the demo mutes itself for a few seconds each minute until licensed.
Recipes
1 · A bassline in thirty seconds
Red → Sound. Decay low, Stiffness up a touch, Body = Double Bass. Draw four narrow squares along the bottom of the plane. Done. Nudge one up a fifth if you're feeling fancy.
2 · A melody that writes itself
Green → Sound, Base Note two octaves above red. Draw three wide squares. PITCH tab: draw a lazy rising-falling curve, set its loop to 3 bars against a 4-bar pattern. Come back in ten minutes; it will have written the part.
3 · Polyrhythm in one move
Red loop 16 × 4. Green loop 16 × 3. Blue loop 5 × 1. Global loop something long — 16 × 16 — so the pattern fully unfolds. Three periodicities, zero effort. Yellow at 7 × 1 if you want the audience concerned.
4 · Granular bed
Blue → Sampler. Load something ambient. Speed 0.3, Grain 250 ms, Decay 0.8, Mode Random. One wide, medium-tall square across most of the bar — a generative pad that never repeats.
5 · Chord progression without rewriting a note
Build a pattern in C Major. On the timeline: C Maj · 2, A Min · 2, F Maj · 2, G Maj · 2 bars. The same squares now play a four-chord song.
6 · Controlled chaos
Dense pattern, all four colours. PRB mode, X at a beat, Y around 0.25. A quarter of the time the playhead trips — enough to scramble, not enough to lose the plot. Solo and mute swatches live like a mixer.
Field Notes
- One colour, one job. Bass red, melody green, pad blue via sampler, percussion yellow. The canvas reads best when colour = instrument.
- Quantization is a feel control. 1/32 feels programmed; 1/2 feels played. Same squares, different musician.
- Nothing playing? Transport running? At least one square? Level faders up? If you expect external sound, is anything listening on the global MIDI channel?
- Sampler silent? The colour's
OUTis probably still on Sound. Routing decides what you hear. - Notes cutting each other off? Colours are monophonic. Parallel voices want parallel colours.
- Key won't change by hand? The timeline is in charge — edit its segments instead.
- Visuals too much / CPU hot? Settings → turn the sphere and bloom down, or off. The music doesn't need them. You might.
- macOS + Ableton can't see the VST3? Re-sign it:
codesign --force --deep --sign - <path-to-plugin>, then rescan. Ableton is particular.